Few desserts carry the nostalgic weight and comforting aroma of a classic, old-fashioned southern pound cake cooling on a kitchen counter. Among the pantheon of scratch-baked treats, one variation stands out as a true vintage masterpiece: the 7Up pound cake.
This comprehensive guide breaks down the ultimate 7up pound cake recipe from scratch, exploring the unique food science that makes a soda-infused batter so spectacularly velvety, fine-crumbed, and moist.
Whether you are baking for a Sunday family dinner, a holiday gathering, or simply satisfying a weekend sweet tooth, this foolproof guide guarantees a show-stopping cake with a signature golden, crunchy crust and a bright, citrus-kissed interior.
What Makes a 7Up Pound Cake So Special?
A traditional pound cake historically earned its name from its straightforward ingredient formula: a pound each of flour, butter, sugar, and eggs. While delicious, traditional versions can sometimes lean toward dense or heavy.
That is where the genius introduction of carbonated lemon-lime soda changes the entire dynamic of the batter.
The magic of a 7up pound cake recipe from scratch lies entirely in its texture and subtle flavor profile. The carbonation (bubbles) in the soda acts as a powerful, all-natural leavening agent.
As the cake bakes, these tiny pockets of trapped carbon dioxide expand, lifting the heavy, rich batter. This results in an incredibly plush, tight, yet surprisingly velvety crumb structure that melts in your mouth.
Simultaneously, the high sugar content and real citrus oils native to the soda infuse the cake with a delicate, bright tanginess that cuts perfectly through the rich, buttery base. It creates a beautiful contrast: a deeply caramelized, crisp outer crust hiding a soft, moist, and tender yellow interior.
Essential Kitchen Equipment
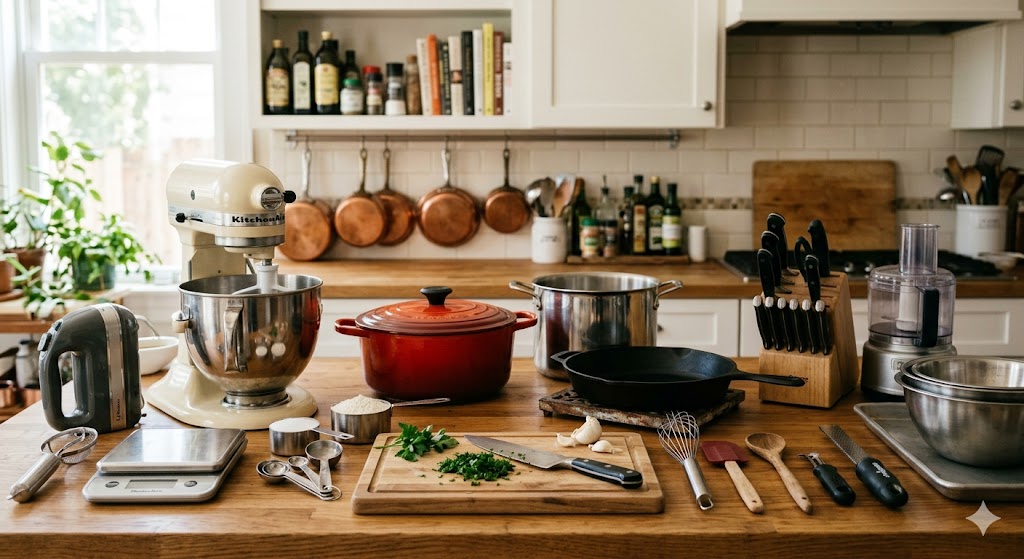
Baking a large, structure-heavy cake like a pound cake requires the right tools to ensure even heat distribution and a clean release from the pan. Before diving into the ingredients, gather the following essential kitchen equipment:
- 10-to-12 Cup Bundt Pan or Tube Pan: A heavy-duty aluminum or cast-aluminum pan distributes heat evenly, which is critical for a cake that bakes for over an hour.
- Stand Mixer or Heavy-Duty Hand Mixer: To achieve the necessary aeration during the creaming stage, a powerful mixer fitted with a paddle attachment is highly recommended.
- Sifter or Fine-Mesh Strainer: Sifting the flour eliminates clumps and introduces air, leading to a more delicate crumb.
- Rubber Spatula: For scraping down the sides and bottom of the mixing bowl to ensure zero unmixed pockets of butter or sugar remain.
- Measuring Cups and Spoons: Precise baking requires exact measurements for both dry and liquid components.
- Cooling Rack: A wire rack allows air to circulate entirely around the hot cake, preventing condensation from making the crust soggy.
- Small Whisk and Mixing Bowl: For whipping together the sweet citrus glaze.
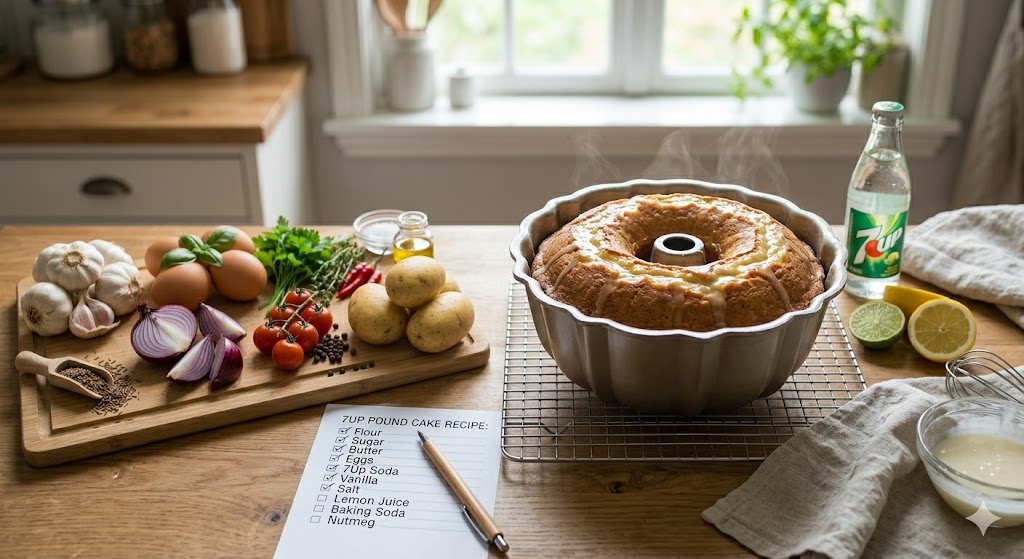
Ingredients Checklist
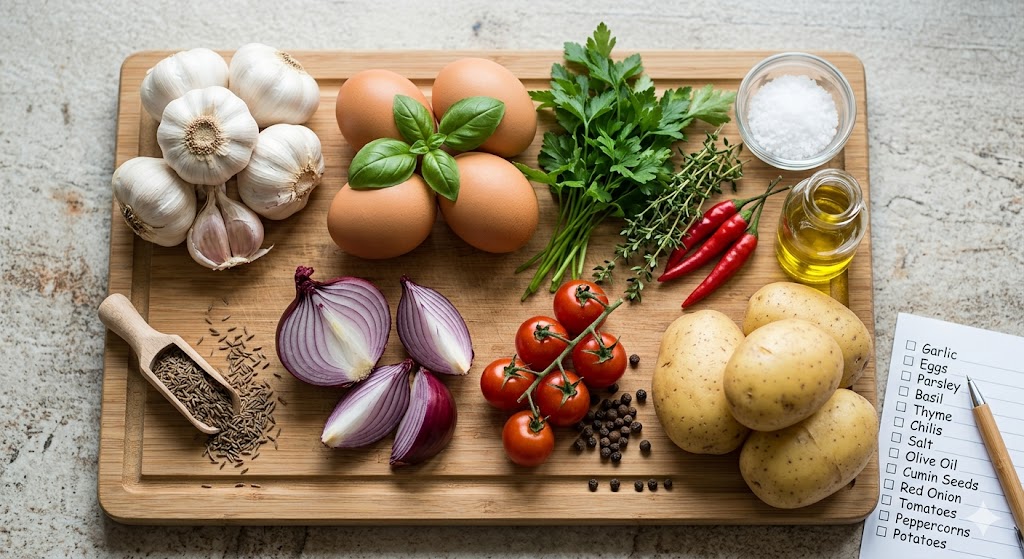
Every single ingredient in a scratch-baked cake serves a structural or chemical purpose. For the absolute best flavor and rise, avoid substitutions and ensure all cold items sit on your counter beforehand to reach true room temperature.
For the Pound Cake Batter
- 3 cups All-Purpose Flour (360 grams): Provides the structural gluten framework. Sift it carefully before measuring.
- 3 cups Granulated Sugar (600 grams): Sweetens, caramelizes for a beautiful crust, and locks in moisture.
- 1 ½ cups Unsalted Butter (3 sticks / 340 grams): Must be completely softened to room temperature (around 65°F to 70°F) for proper creaming.
- 5 Large Eggs: Also at room temperature to prevent the creamed butter from curdling or seizing.
- ¾ cup 7Up Soda (180 ml): Use full-sugar, freshly opened, room-temperature soda. Do not use diet soda or flat soda.
- 1 tablespoon Pure Vanilla Extract: Adds a warm, aromatic baseline flavor.
- 1 tablespoon Fresh Lemon Juice: Elevates the bright citrus notes.
- 1 tablespoon Lemon Zest: Finely grated to distribute aromatic citrus oils throughout the crumb.
For the Signature Citrus Glaze
- 1 cup Powdered Sugar (Confectioners’ sugar): Sifted smooth to eliminate lumps.
- 1 to 2 tablespoons 7Up Soda: Adds sweetness and consistency control.
- 1 tablespoon Fresh Lemon Juice: Provides a sharp, bright contrast to balance the sweet sugar.
How to Make It: Step-by-Step Instructions
Follow these chronological steps closely. The mixing timing is carefully designed to build structural air pockets without overworking the flour’s gluten.
Step 1: Creaming the Butter and Sugar
Place your 3 sticks of room-temperature unsalted butter into the bowl of your stand mixer. Turn the mixer to medium speed and beat for roughly 2 minutes until smooth and creamy. Slowly stream in the 3 cups of granulated sugar.
Once all the sugar is in, increase the mixer speed to medium-high and let it run for 5 to 7 full minutes. Do not rush this step. You are looking for a physical transformation: the mixture should turn pale ivory, looking light, fluffy, and almost doubled in volume. This process embeds microscopic air bubbles into the fat, which is essential for a high rise.
Step 2: Incorporating the Eggs
Turn the mixer down to medium-low speed. Add the room-temperature eggs one at a time, allowing each egg to fully disappear into the creamed butter before cracking in the next one. Scrape down the sides of the bowl with your rubber spatula halfway through. Once the final egg is mixed in, blend in the vanilla extract, fresh lemon juice, and finely grated lemon zest
.
Step 3: Alternating Dry and Liquid Ingredients
Turn your mixer down to its lowest speed setting. You will now alternate adding your sifted all-purpose flour and your room-temperature 7Up soda to the bowl.
- Add roughly 1 cup of flour, mixing just until the white streaks disappear (about 10 seconds).
- Pour in half of the 7Up soda ($3/8$ cup), allowing it to fizz and gently combine.
- Add another 1 cup of flour, mixing gently.
- Pour in the remaining half of the 7Up soda.
- Finish by adding the final cup of flour.
Stop the mixer immediately once the last bit of flour blends in. Over-mixing at this stage activates the gluten in the flour, turning your delicate cake tough and rubbery. Use a rubber spatula to do a final gentle fold by hand, ensuring the bottom of the bowl is fully integrated.
Step 4: Filling the Pan and Baking
Gently pour the thick, glossy batter into your prepared Bundt pan. Use the back of a spoon or a spatula to smooth out the top surface evenly. Tap the pan firmly against your kitchen counter 3 or 4 times to force any trapped air pockets or large bubbles to rise to the top and pop.
Place the pan onto the center rack of your preheated oven. Bake at 325°F (163°C) for 70 to 80 minutes. Resist the temptation to open the oven door during the first 50 minutes of baking, as sudden drafts can cause a rising cake to collapse.
At the 70-minute mark, insert a long wooden skewer or cake tester deep into the thickest center part of the cake. It should come out clean or with a few dry, crumbly crumbs attached. If it has wet batter on it, leave the cake in for another 5 to 10 minutes.
Step 5: The Critical Cooling Phase
Once fully baked, remove the pan from the oven and set it onto a wire cooling rack. Let the cake cool undisturbed inside the pan for exactly 15 to 20 minutes. During this window, the cake’s internal structure firms up while it naturally contracts slightly away from the pan edges.
If you try to flip it immediately out of the oven, it will tear apart; if you leave it in the pan for hours, the cooling sugar will act like glue and stick to the metal walls permanently. After 20 minutes, place your wire cooling rack face down over the open top of the pan, carefully invert both together, and lift the pan straight up. Let the cake cool completely to room temperature before glazing.
Step 6: Mixing and Applying the Citrus Glaze
In a small bowl, whisk together the sifted powdered sugar, fresh lemon juice, and 1 tablespoon of 7Up soda. Whisk vigorously until a smooth, pourable glaze forms. If it feels too thick, add a tiny splash more soda; if it is too watery, add a tablespoon more powdered sugar. Slowly drizzle the glaze over the crown of the cooled cake, allowing it to decoratively cascade down the fluted grooves of the sides. Let the glaze set for 15 minutes before slicing.
(FAQ)
Can I use Sprite or Sierra Mist instead of 7Up?
Yes. Any high-quality, full-sugar lemon-lime soda will work fine because they share identical levels of carbonation and high acidity. However, avoid using generic or bargain brands that might have lower levels of carbonation, as this directly reduces the structural lift of the cake.
Why did my pound cake drop or collapse in the center?
A sunken center usually stems from one of three factors: under-baking the cake, opening the oven door too early during the baking cycle and letting cold air rush in, or over-measuring the 7Up soda. Excess liquid or lost carbonation before the gluten structure sets will cause the cake to rise rapidly and then implode.
How should I store left-over 7Up pound cake?
Because this cake locks in moisture exceptionally well, it stores beautifully. Wrap the cooled, glazed cake tightly in plastic wrap or place it inside a cake dome.
It stays fresh at room temperature for up to 3 to 4 days, or inside the refrigerator for up to a week.
Can this pound cake recipe be frozen?
Absolutely. Pound cakes freeze exceptionally well. Wrap the unglazed, completely cooled cake tightly in two layers of plastic wrap, followed by a sturdy layer of heavy-duty aluminum foil.
It can be frozen for up to 3 months. Thaw it completely overnight on your kitchen counter while still wrapped before adding the fresh glaze and slicing.
Conclusion
Baking an authentic 7up pound cake recipe from scratch bridges the gap between old-fashioned kitchen wisdom and simple baking science.
By leveraging the carbonation of a classic soda, you elevate a simple, rich butter cake into an incredibly moist, fine-crumbed masterpiece that balances rich dairy tones with sharp, summery citrus accents.
Keep your ingredients at room temperature, take your time creaming the butter and sugar, and respect the cooling window—and you will effortlessly deliver a show-stopping southern classic that outshines any box mix imaginable.