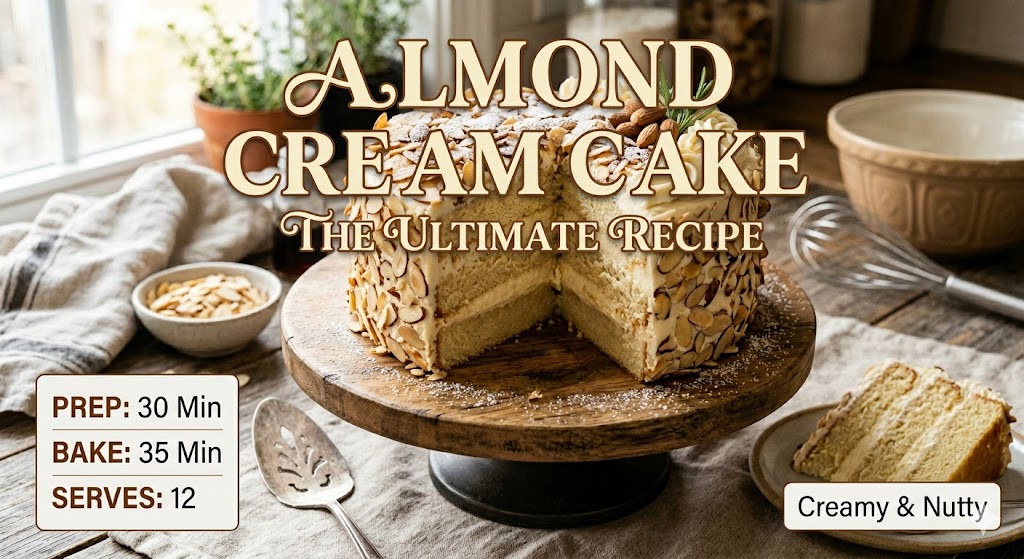
There is something undeniably elegant about the flavor of almonds. Unlike overly sweet confections, an authentic almond cream cake recipe strikes a perfect balance between sophisticated nuttiness, rich moisture, and a delicate crumb.
Whether you are hosting an elegant dinner party, celebrating a milestone, or simply craving a comforting slice of baking perfection alongside your morning coffee, this cake delivers on every level.
What makes this specific almond cream cake recipe stand out is its multi-dimensional approach to flavor and texture. Instead of relying solely on artificial extracts, this recipe layers real almond flour, a rich almond custard cream filling, and toasted sliced almonds for a satisfying crunch.
In this comprehensive guide, we will walk you through everything you need to know to bake this showstopper from scratch.
From selecting the right equipment to mastering the velvety cream filling, you will learn the exact steps required to achieve bakery-quality results right in your home kitchen.
The Secret to a Perfect Almond Cream Cake Recipe
Before diving into the steps, it helps to understand what makes an almond cream cake recipe truly successful. A common mistake in almond-flavored baking is over-relying on almond extract, which can quickly make a cake taste like cherry medicine if overdone.
To avoid this, our recipe utilizes a threefold almond strategy:
- The Crumb: Mixing finely ground almond flour with high-quality cake flour creates an incredibly tender, melt-in-your-mouth texture that retains moisture beautifully.
- The Cream filling: An authentic Italian-style Crema Diplomatica (pastry cream lightened with whipped cream) infused with pure almond extract serves as the luxurious filling.
- The Garnish: Sliced almonds are toasted to golden perfection, releasing their natural oils and adding a crucial structural contrast to the silky cream.
Almond Cream Cake Recipe s Equipment
To ensure a smooth baking experience, gather your tools before you begin. Having the right equipment ensures precise measurements and proper textures.
- Two 9-inch round cake pans: Light-colored aluminum pans are preferred, as dark pans can cause the edges of the cake to over-bake and brown too quickly.
- Stand mixer or electric hand mixer: Crucial for creaming the butter and whipping the cream to the perfect volume.
- Fine-mesh sieve: For sifting the flours to prevent any clumps in your batter.
- Medium saucepan: Essential for cooking the homemade pastry cream base.
- Silicone spatulas: For gently folding ingredients together without deflating the incorporated air.
- Parchment paper: To line the bottom of your cake pans, guaranteeing a clean release.
- Wire cooling racks: To properly cool the cake layers and prevent condensation from making them soggy.
- A long serrated knife or cake leveler: For cleanly splitting your cake layers.
Ingredients Checklist
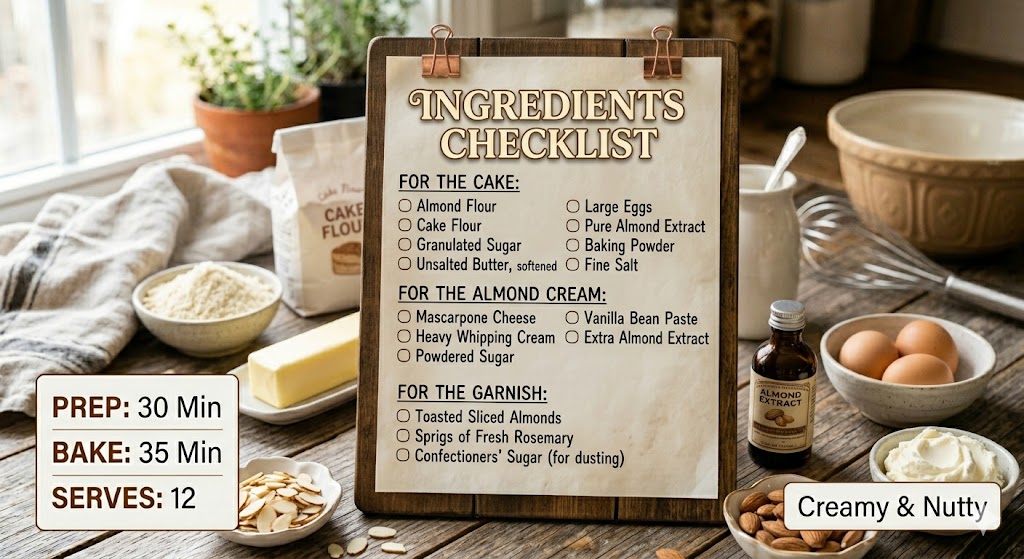
Every great bake starts with quality ingredients. For this almond cream cake recipe, ensure your dairy and eggs are at room temperature to create a smooth, emulsified batter.
For the Almond Sponge Layers:
- 1 ½ cups (180g) Cake flour: Low-protein flour ensures a soft, delicate crumb.
- 1 cup (100g) Almond flour: Super-fine, blanched almond flour yields the best texture.
- 2 tsp Baking powder: Our primary leavening agent.
- ½ tsp Fine sea salt: To balance the sweetness and enhance the nutty profile.
- 1 cup (225g) Unsalted butter: Softened to room temperature.
- 1 ½ cups (300g) Granulated sugar: Provides sweetness and structure.
- 4 Large eggs: Room temperature.
- 1 tsp Pure vanilla extract: For a warm, foundational flavor.
- 1 tsp Pure almond extract: High-quality extract makes a world of difference.
- ¾ cup (180ml) Whole milk: Adds moisture and richness to the batter.
For the Velvety Almond Cream Filling & Frosting:
- 2 cups (480ml) Whole milk: The base for our pastry cream.
- 4 Large egg yolks: Gives the cream its rich, custardy texture.
- ½ cup (100g) Granulated sugar: To sweeten the filling.
- ⅓ cup (40g) Cornstarch: The thickening agent for the custard.
- 2 tbsp Unsalted butter: Stirred in at the end for a glossy finish.
- 1 tsp Pure almond extract: To infuse the cream with signature flavor.
- 1 ½ cups (360ml) Heavy whipping cream: Kept cold, whipped to stiff peaks to fold into the cooled custard.
- ¼ cup (30g) Powdered sugar: To stabilize and lightly sweeten the whipped cream.
For the Garnish:
- 1 cup (100g) Sliced almonds: Toasted until aromatic and golden brown.
- Powdered sugar: For a final, elegant dusting over the top.
Step-by-Step Preparation Guide
Follow this structured, chronological method to assemble your masterwork. Do not skip the cooling times; putting cream onto a warm cake will result in a collapsed, melted disaster!
1.Prep the Oven, Pans, and Garnish:15 minutes.
Preheat your oven to 350°F (175°C). Line the bottoms of your two 9-inch round cake pans with parchment paper and grease the sides generously with butter. Spread your sliced almonds on a baking sheet and toast them in the preheating oven for 6 to 8 minutes until golden. Set them aside to cool completely.
2.Cook the Almond Custard Base:20 minutes + cooling.
In a medium bowl, whisk together egg yolks, ½ cup sugar, and cornstarch until thick and pale. In a saucepan, heat 2 cups of whole milk over medium until it just begins to simmer. Slowly drizzle the warm milk into the egg mixture while whisking constantly to temper the eggs.
Pour the mixture back into the saucepan and cook over medium heat, stirring continuously, until it thickens into a glossy custard. Remove from heat, stir in 2 tbsp of butter and 1 tsp of almond extract. Transfer to a bowl, press plastic wrap directly onto the surface of the cream, and chill in the fridge for at least 2 hours.
3.Mix and Bake the Sponge Layers:40 minutes.
Sift together the cake flour, almond flour, baking powder, and salt. In your mixer, beat the softened butter and 1 ½ cups of sugar together for 4 to 5 minutes until fluffy. Add the eggs one at a time, followed by the vanilla and almond extracts. Alternately add the dry flour mixture and the ¾ cup of milk to the butter mixture, starting and ending with the flour. Divide the batter equally between your prepared pans and bake for 25 to 30 minutes, or until a toothpick inserted into the center comes out clean. Cool completely on wire racks.
4.Assemble the Diplomat Cream:10 minutes.
Once the custard base is thoroughly chilled, use a hand mixer to beat it briefly until smooth. In a separate cold bowl, whip the heavy whipping cream and powdered sugar together until stiff peaks form. Gently fold the whipped cream into the smooth almond custard in three separate batches using a silicone spatula. This creates your light, airy almond cream frosting.
5.Layer, Frost, and Decorate:15 minutes.
Using a long serrated knife, carefully slice both cooled cake layers horizontally in half to create four thin layers. Place the first layer on a serving platter and spread a generous layer of almond cream over it. Repeat with the remaining layers. Use the rest of the cream to lightly frost the top and sides of the cake. Gently press the cooled, toasted sliced almonds all over the sides and top of the cake. Dust lightly with powdered sugar before serving.
Baker’s Tips for Success
- Measure Flour Accurately: If you don’t use a kitchen scale, fluff your flour with a spoon, scoop it into the measuring cup, and level it off with a knife. Packing flour down directly from the bag will result in a dense, dry cake.
- Temper Your Eggs Carefully: When making the pastry cream, adding the hot milk too quickly will scramble your eggs. Take your time adding the liquid in a slow, steady stream while whisking rapidly.
- Let it Rest: While you can slice into this almond cream cake recipe immediately, letting it sit wrapped in the refrigerator for 4 to 6 hours allows the almond cream to settle and hydrate the sponge layers, making it significantly easier to slice cleanly.
(FAQ)
Can I make this almond cream cake recipe gluten-free?
Yes! To convert this almond cream cake recipe to a gluten-free format, replace the 1 ½ cups of cake flour with an equal amount of a high-quality 1:1 gluten-free baking flour blend that contains xanthan gum. The pre-existing almond flour in the recipe naturally lends itself well to gluten-free adaptations.
How should I store leftovers?
Because of the heavy dairy content in the homemade cream filling, this cake must be stored in the refrigerator. Keep it in a cake keeper or loosely tented with plastic wrap for up to 3 to 4 days.
Can I freeze the cake layers in advance?
Absolutely. You can bake the sponge layers, let them cool completely, wrap them tightly in a double layer of plastic wrap and aluminum foil, and freeze them for up to 2 months. Thaw the layers in the refrigerator overnight before slicing and assembling with fresh cream filling. Do not freeze the assembled cake, as the custard cream filling can separate and become watery upon thawing.
My cream filling is too runny. How do I fix it?
If your cream filling isn’t holding its shape, it’s usually because the custard base wasn’t cooked long enough to fully activate the cornstarch, or it wasn’t chilled completely before folding in the whipped cream. You can fix a slightly soft cream by chilling the fully assembled cake for a few hours to let the starch and cream structure firm up.
Conclusion
Baking an authentic, scratch-made cake is an act of love, and this classic almond cream cake recipe is worth every single step. The combination of the nutty, melt-in-your-mouth sponge, the velvety smooth diplomat cream filling, and the crunch of toasted almonds creates an unforgettable dessert experience that rivals any luxury bakery.
By following this guide, focusing on room-temperature ingredients, and giving your components plenty of time to cool, you will create a stunning centerpiece dessert that your friends and family will talk about for weeks to come. Grab your apron, fire up your oven, and enjoy the beautiful process of home baking!